Tutorial - Making a Baby's Blankie Soother
These are always appreciated as gifts for new babies or for your own child. It is better to make your own so you can always make a replacement when the much loved favourite gets lost or left on a plane (for example). Here is one I made.
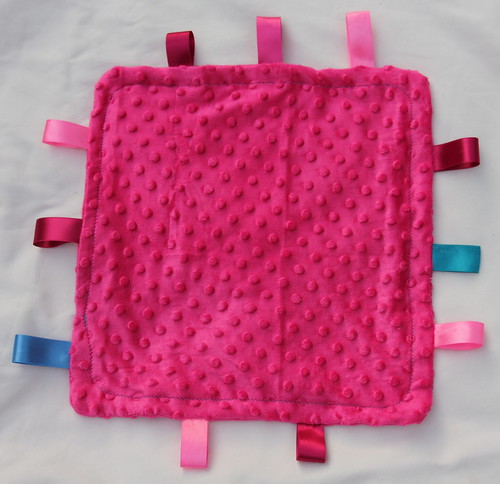
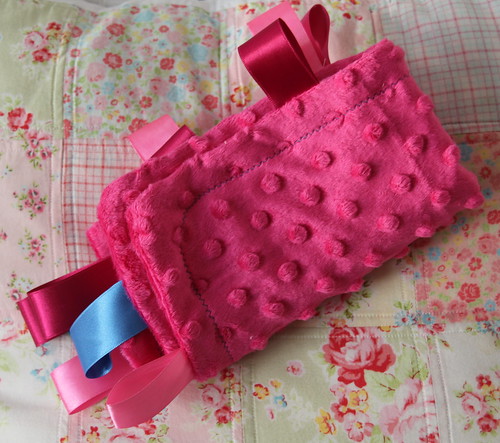
I have made a few of these and earliest versions had a problem with the ribbons coming off. The satin ribbon is so fragile that stitching through it a few times in one place to try to anchor it weakens it and this is the place where it ends up breaking. So I have thought of how to stop this happening. I bought a piece of minky which was 72cm x 48cm and was $6.99 from spotlight. I didn't use it all and cut out two squares which are approximately 36 x 36cm. I got hot pink. Then I bought an assortment on ribbons. I used single and double sided satin of about 2.5cm wide. I have some thick pink striped ribbons also that I wanted to use but couldn't find it. Hate that. First take the ribbons. I cut mine into 17cm lengths and I cut with pinking shears. Then I took some fabric and cut small rectangles to go around the last 2.5cm of the ribbon once it is doubled over. I then sewed this using zigzag stitch back and forth on the ends of the ribbons. So now you have the ribbons loops.
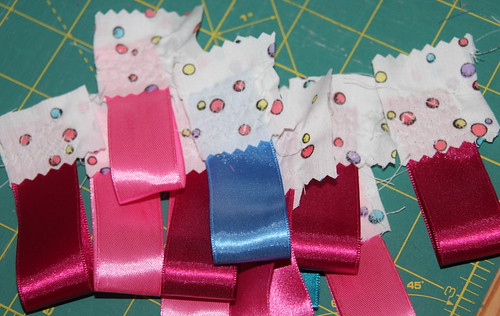
I wish I had used contrasting thread so you could see I have zigzagged back and forth covering about 2.5cm of the ribbons length at the end. I tried not to go over any one part more than once as this weakens it in that area. You can see that the ribbons cannot ever be pulled out of the fabric reinforcement.
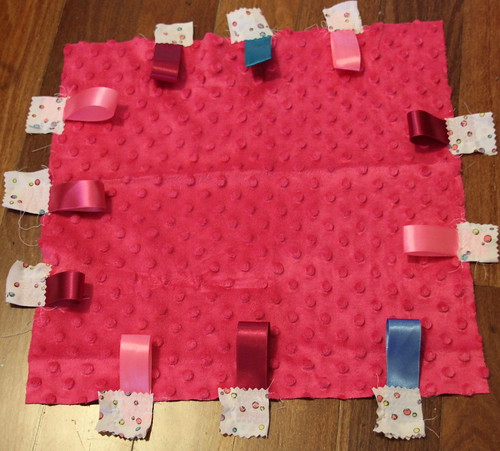
I then sewed all the ribbons onto the right side of the minky wherever I wanted them and I sewed through the fabric and ribbon. The fabric and ribbon was hanging off the sides of the minky as shown. I then placed the other minky square on top with right sides together and sewed around leaving a gap to turn it. Make sure all the ribbons are pointing inwards and the fabric cannot be seen once turned the right way. You could also use flannel on one of both sides or whatever soft fabric you choose.
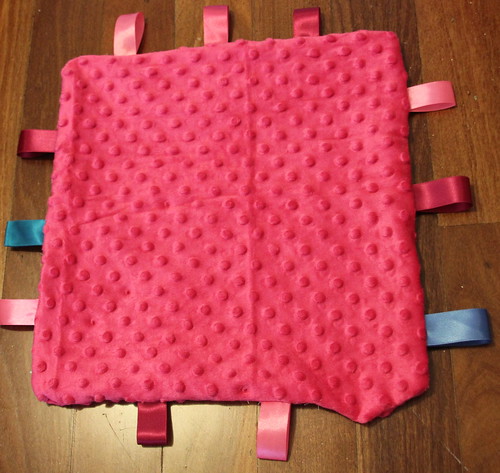
I then turned it the right way out and sewed up the hole. I then stitched all the way around about 1.5cm from the edge using a contrasting colour and zigzag stitch. This will grab the fabric and ribbon ends again and just neatens it up. Mine isn't completely straight and my ribbons are not all lined up perfectly. I don't mind this...I think.
So now it can be wrapped up and given to someone who might just cuddle and love it and hug it more than anything else they have for a few years. How amazing is that?
I'm a big fan of handmade gifts, this Is beautiful. Glad you could find a solution to those breaking ribbons.
ReplyDeleteOkay, I'm only guessing here from what my daughter used to do with her blankie - she used to love twiddling the tag while she clutched her blankie (and sucked her finger) - is that what the ribbons are for?
ReplyDeleteYou've done a beautiful job!
Visiting from #TeamIBOT xxx
These are so cute. I could do with one of these for my almost 6-month old now. I'm busy on a quilt for my 2 year old at the moment... but this would be a nice, relatively quick project.
ReplyDeleteLove the texture of the fabric you used, I can just see tired little fingers stroking it as they drop into slumber :)
ReplyDeleteLove it! And I'm sure some little tot will be very happy with it.
ReplyDeleteWhat about adding an applique picture on one side.... I'm sure it could be stitched on securely enough to be solid for tots....
You are very clever and it's so pretty - even though it looks simple i don't think I could do it :-( I failed at sewing at school - although i loved learning about the history of fashion.
ReplyDeleteI really like how you attached your ribbon to the minky and your blanket is beautiful! Thanks for sharing. Stopping by from Sugar Bee :)
ReplyDeleteRamblingReed.blogspot.com
Awesome idea! I think this will be my new baby gift :)
ReplyDeleteWhat a great sewing project for me - I am a brand new sewer!
ReplyDeleteWe would love for you to stop by and link them up today at our Artsy Play Wednesday Linky!
http://www.multitestingmommy.com/2013/05/artsy-play-wednesday-easy-preschool.html
I love minky! These little lovey's are so cute. Thank you for sharing! I’d love to have you visit me at Get Your Crap Together! We have a Pattern Party from the 1st of the month to the 10th and would love you to check it out. See you soon!
ReplyDeleteWhat a great gift and so thoughtfully made with those ribbons
ReplyDeletereally neat Idea I have never seen these before have a few babies due this year and just might make some up for them!!
ReplyDeleteSuper cute!
ReplyDeleteI would love for you to share this and link up to my TGIF Link Party! Who knows, you just might be featured next week!
http://apeekintomyparadise.blogspot.com/2013/05/a-peek-into-my-paradise-tgif-link-party.html
Cathy
Great idea for a really cute blankie - a perfect gift! I would love it if you would consider linking to Busy Monday at A Pinch of Joy, a link party that starts Sunday evening for ideas that make life better, easier or more fun!
ReplyDeleteA Pinch of Joy/
We offer 196 colors and 19 sizes solid satin ribbon in stock for choice. Please contact us if you need!
ReplyDelete