Friday 31 May 2013

Pinwheel Quilt

This is my favourite of the quilts I have made so far.  It is made up of pinwheels and a 2.5" scrappy border around the edge.
It is made with Tanya Whelan fabric called hatbox.  I love the fabric and this style of fabric generally.  I love the colours, and I love pinwheels.  I got inspiration to make this quilt mainly from here and also here.
This image is from here and just made me want to make one like it.  I love it and the fabric here is ginger blossom by Sandi Henderson.
My colours are more muted but I don't seem to be able to get my photo colours to pop like others do.  I am working on that.
I pieced my pinwheels using 5" squares, two white and two coloured for each pinwheel.  I used a tutorial on youtube for instructions. I saw a tutorial for using two squares and sewing around all four sides to generate four pairs of half square triangles by cutting diagonally corner to corner twice.  I am glad I didn't do that as I had enough distortion the way I did it.  Doing it the other way would have lead to even more seams on the cross than I had which means it will all be more stretchy and easy to deform.
When I put the borders on I forgot the golden rule of measuring through the centre to determine the lengths of the borders.  I just sewed on enough border and found that it was a bit 'frilly' afterwards because the borders were longer than the centre of the quilt due to triangles deforming and stretching.  I took them off and resewed them on again after measuring them and it was ok.  This was just annoying as I ended up basting it twice.
I pieced the back with more hatbox fabric and the binding if a dot from the same line.  I love this quilt and it lives on our sofa and is often used on chilly evenings.  I machine quilted it with lines in a grid about 0.25" from the seams around each pinwheel.
In other news, my hexagon log cabins quilt is progressing slowly.  I sewed a lot of it together with triangles in between and I was grappling with it and it just wasn't fitting together and looked absolutely awful - most of it wasn't lining up at all.  So I ended up taking it all apart and cutting all of the hexagons and triangles to size accurately.  It isn't rocket science!  I just thought I could coax them into fitting and get it good enough, but it just ended up taking far longer and looking much much worse than I thought.  So that was a lesson learnt - make sure everything is the right shape and size first!  I have fussy cut some of the triangles and the one above is my favourite because it has a pink elephant on it.  That was right on the edge of my 'parade' fat quarter from children at play by Sarah Jane.  I couldn't have done much else with it so it has made some really nice fussy cut triangles.
Have a great weekend!

Thursday 30 May 2013

How to make Loose Sofa Covers

18 months ago we moved into our newly renovated house and had a lot more space.  We had spent all of our money on the renovation so we were not in the market for buying furniture.  Some people set aside money for doing that but we just don't do that.  So I kept my eye our on freecycle for furniture.  We had only been back in the house for 6 weeks when an advert came up for two two seater sofas, and they were only about 2 miles away.  I asked for them immediately.  It wasn't that surprising that I was given them because the advert said they were good quality sofas but a bit grubby so needed either throws or ideally loose covers.  Not many people are actually looking for sofas like that, particularly two of them.  I sent my husband for them and he made two journeys and used the roof rack.
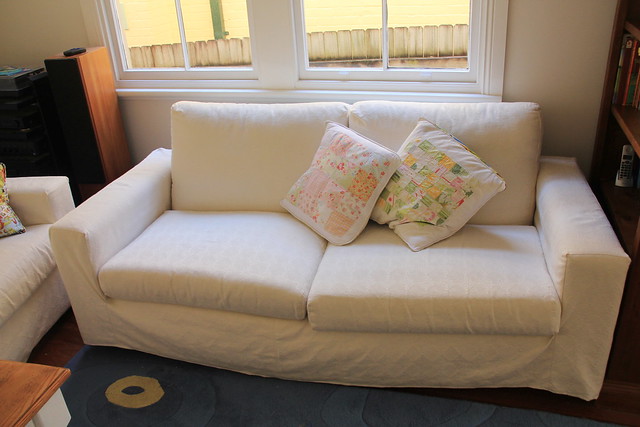
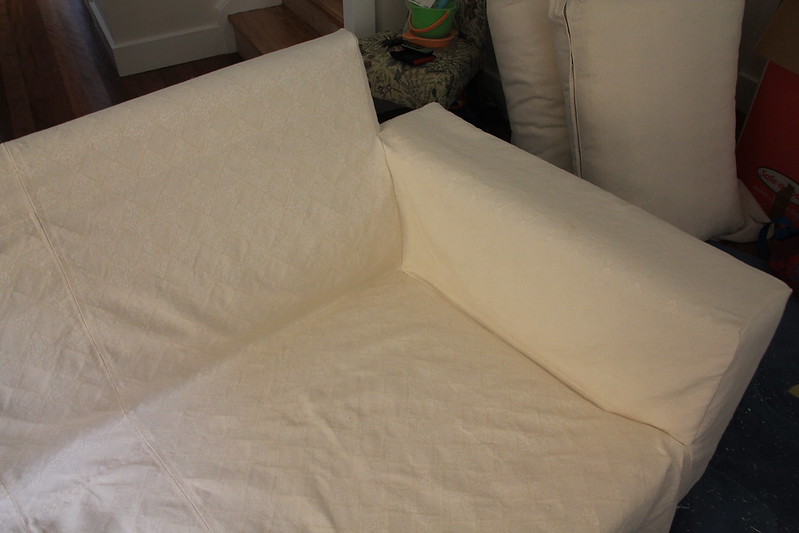
This is one of them finished!
I was so happy when I saw them that they are really square and so very easy to cover.  I started with the cushions so we could actually sit on them.  I reused the old zips.  I went to my favourite local upholstery fabric shop and got the end of a roll for only $7 per metre to do the first sofa.  I think it needed about 7 metres.  Once I started I realised I wanted to do both in this fabric so I went back and bought enough for the other one. I had known they had another whole roll of that fabric when I bought the first piece.  Total cost of fabric was $130.  The fabric I got is cotton and polyester so it won't shrink and will be easy to wash and dry.
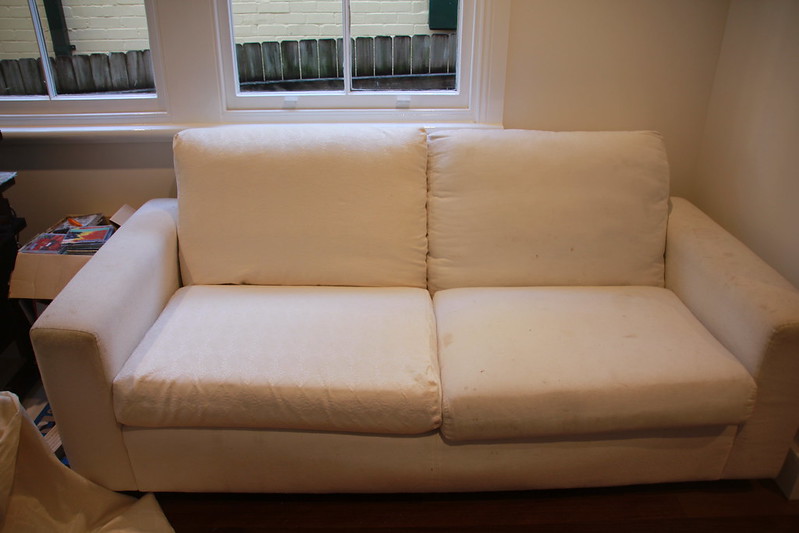
Here is one before - it was quite grubby.  I thought it was not a very good idea to buy a white sofa without loose washable covers.
The old cushions were fixed in place with zips.  I decided not to do this. 
With the cushions done it was already so much better and we could sit on them. I just made them by using one large piece the width of the cushion which went all the way around.  Then I cut side pieces and sewed them into a bag.  I made the the cushion fitted in nicely and added the zip at the end. 
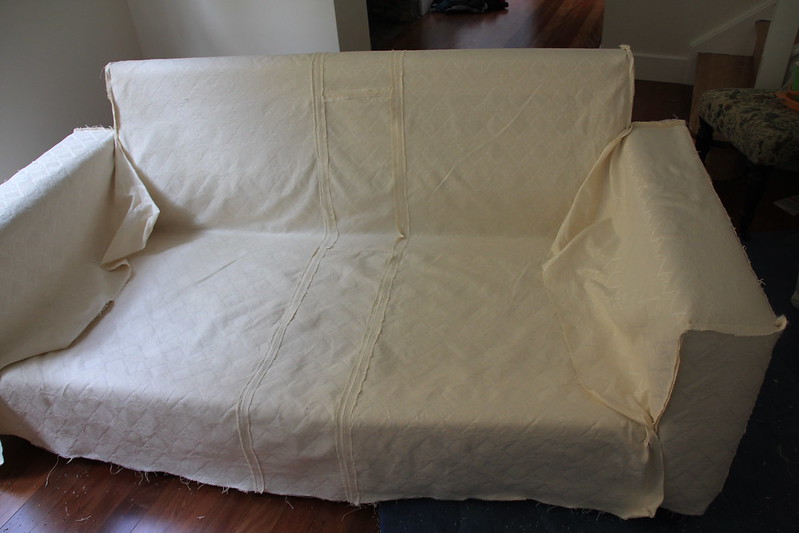
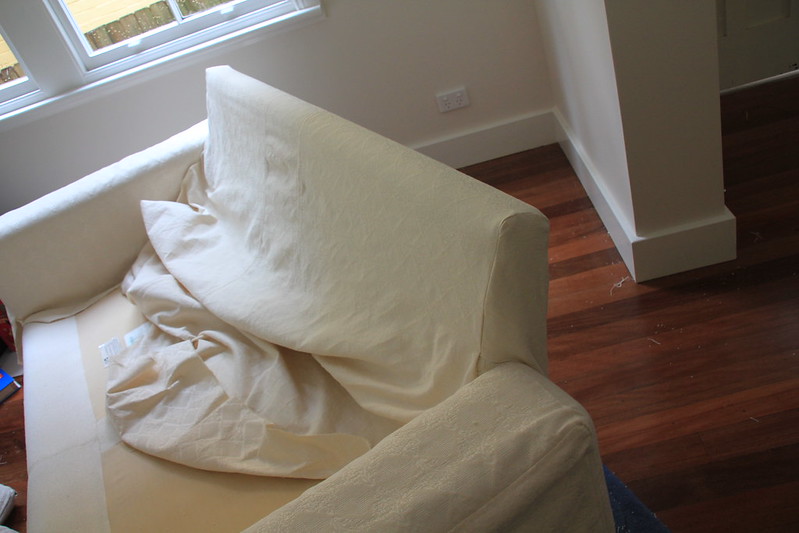
Here is the cover inside out and still in pieces.  I started by making the arms.  I measured the height, depth and width required and cut out fabric with a generous seam allowance.  So I cut side, front, top, back, and inner side pieces.  I sewed them together and checked they fitted nicely.  For the main part of the sofa I made a very large piece which needed a seam down the middle so I chose to do two seams as shown.  To get it to fit I placed it on the sofa wrong side up as shown and cut the top/side pieces and tacked them on in situ.  Then I removed it and machine sewed them. 
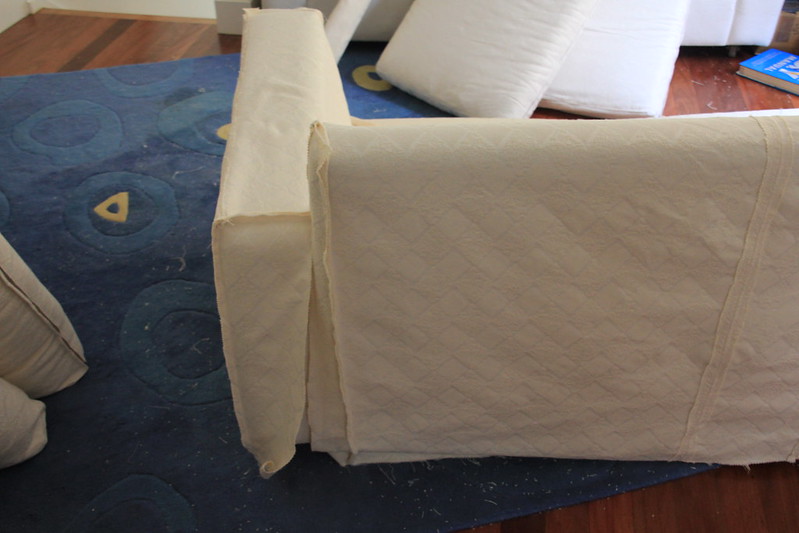
When I was putting the top/side piece it had to go all the way down the back to make it fit.
Then I turned it over and basically felt good that it fitted and I was going to have a 'new' sofa.  As you can just about see I sewed down each side of some of the seams on the front because I liked the look of it and I think it will be more robust if washed a lot and stop it from fraying. 
Sewing the arms onto the main part was the hardest part and I tried to avoid puckering.  I mostly managed it.  Again putting the parts on the sofa inside out and tacking them together is one way to do it.  These areas are covered by the cushions anyway and I guess this is why, a year later, only one of the two sofas is actually joined together into one piece here.
Finally I just hemmed it all the way around.  I thought about getting velcro and sticking it to the underside of the sofa and I think this would have been better but I didn't do it.  I think a lot of professional loose covers do this (e.g. ikea) and it does look great.  I will do this next time. 
I was honestly surprised at how quickly and easily these came together.  I expect they took about 20 hours for both sofas.  And I am so happy with the result.  The cost was $2 petrol to collect them (very approximately), $130 fabric and $5 thread.  Total = $137.
If you have a sewing machine, you could do this too.  The hard part is finding the sofas in the first place which are a good shape to cover.

Friday 24 May 2013

Progress on Hexagon Log Cabins

We have all been a bit under the weather in our house this last week or so as winter approaches.  But I have been getting into the sewing room in the evenings and I have been doing hexagon log cabins.  I have now done 18.
I am thinking about how to lay them out and how to finish the quilt. I don't want to make any more hexagon log cabins really, so I thought I would do a large border of scrappy trips.  Scrappy trips are blocks of squares, where there are several fabrics used the squares are in diagonal lines.  I used this technique for my dolls blanket here.
So I thought I would arrange them like this and add triangles in to make them into diamonds and then sew them together.  Then I think I will do more triangles to fill up the odd spaces and then a border of squares. It's a plan.


 Those are some of my favourite hexagons.  I think it is going to be a very pink quilt...

Wednesday 22 May 2013

I finished the Coffee Table

About 2 weeks ago I got a coffee table on freecycle.  I was so happy because it was just a few doors away and I didn't have to use the car, which meant not only was it recycling but zero carbon emissions!
I have now finished it.
I sanded the legs, primed and painted with white semi gloss water based paint.  Then I sanded the top.
Once I started sanding it I loved all the nicks and marks and 'usedness' of it so I didn't sand much to leave it with a distressed and shabby appearance.  I was planning on varnishing it with water based semi gloss varnish but instead I used a furniture wax because it just feels kinder to the wood.  It also leaves it silky smooth to the touch which varnish just cannot seem to replicate.  The problem with it is that if you get it wet it leaves marks, but you can't have everything.
Here is what it was like before.  Just not very attractive.

I am not sure if we will end up using the basket with it or not.
Grand total dollars spent on this is less than $5 I would estimate as it was just wax and paint I already had.  It was very quick to do too.

Friday 17 May 2013

Hexagon Log Cabins

I have started a new project and it is hexagon log cabins!  I saw it on The Sewing Chick and I knew I wanted to do it and had just the fabric I wanted to use.  I was given Children at play by Sarah Jane about 18 months ago and decided it is just the right combination of large and small designs perfect for this.
This is my first hexagon.  The centre hexagon is 5" diameter and I added on a 0.25" seam allowance all the way around.  The strips were cut 1.25" wide.
The sewing chick did scrappy rings around most of her hexagons and showed some with just three colours and each ring the same fabric so I decided to do mine like this.
I have made two so far. They are fun to make.
I have fussy cut the next few hexagons so I will be starting on them soon.  I will have more to show next week.  Have an amazing weekend!

Monday 13 May 2013

Wall Hooks on a Board

I needed some hooks in the bedrooms.  I often see them in shops and they are just one of the growing number of things I look at in shops and make a mental note that this looks easy and I should make this instead of buying it.  It is a very long list now and made longer but the advent of pinterest.  I have a board on there called things I want to make and it is just for this purpose.
Well I got around to making one thing, and it is a board with hooks on to hang on the wall and hang things on.
It is made completely with things I had to hand and so effectively cost me nothing.
It is made from an old drawer front with is solid wood and two hooks which I had lying around.  They were both in houses we bought, and we took them down and kept them. 
This is what they looked like before.  I filled in the centre hole with filler and sanded it thoroughly.  I lightly sanded the blue paint and primed it and then painted it with white semigloss. 
I was going to use it like this but I decided it needed to be a little bit more interesting so I did decoupage with some maps from an old atlas.  I also gave it a few coats with cabothane clear water based varnish on top.
Then I screwed it into the wall.  The screws for this are hidden under the hooks.  I could have made some way of hanging it on the back but decided to do it this was as we aren't going to be moving it. 
I left the sides showing the dovetails from the old drawer sides.  I like this detail.
I think I need to make some more and I may have to buy the hooks next time. 
I hope you all had a nice mothers day, those of you who are mums and celebrated it yesterday.  I had a wonderful roast dinner cooked for me and had a lovely day. 

Friday 10 May 2013

Bee Blocks, Continued

I have been quiet this week.  Just working on some things that aren't finished yet and not working too hard on anything.  And being a mum of course.  I have completed four bee blocks for the Diary of a quilter Virtual quilt bee.
This is my favourite one and it is called origami star and it is designed by Sukie from sukiedontyaknow
Yes, I am going to make all my blocks in pink and blue.
This one is by April Rosenthal of Prairie Grass Patterns
It has no name.
 Here are the four I have done so far.  I fixed the bottom right one with a bit of unpicking and resewing so now I am happy that it is straight and not puckered.
I do intend to start on some kids clothes making as I have cut out the pattern ready and have the supplies to do it.  Just gearing up.  Plus we have mothers day on Sunday!  Enjoy it everyone!
Have a great weekend.

Monday 6 May 2013

Starting Virtual Quilting Bee

I have decided to join in a virtual quilting bee hosted by Amy at Diary of a Quilter.
I have done two so far.  The first one I did is number 5.
It is a bit puckered and not straight so I will probably unpick some of it and redo it to get it straight.
The second one was harder and it is block number 1.
The corners don't line up that well but it is at least more square than the other one.  I am happy with the colours.  The fabrics for both are Pam Kitty Love which you can still buy, and a bit of Tanya Whelan.
 There will be 16 blocks in total and once I have caught up and done the first 5 there will be one every 2 weeks.  I think it is going to improve my skills and accuracy a lot. 


Virtual Quilting Bee

Friday 3 May 2013

Personalised Cushion

I have finished the cushion I was making for a friend. 
I am pretty happy with it and it looks nicer with a cushion in it.  I think she and her little girl will like it.
I made an envelope closure for the back, using taronga zoo fabric which is nice a heavy but also fun.  I do have a lot of waste from it though because it doesn't have too many parts with the harbour bridge and zoo sign on it so I have to always use those and leave the rest.
It is nice to have something finished for the weekend.  I have ideas in my head for a new quilt, plus the supplies to make a dress for my little girl.

 This cushion might look hard to some people but honestly, it is not very difficult and I think anyone could do it if they had a sewing machine and the inclination. 
The H is raw edge applique and I have quilted it with straight lines as you can see in the close ups.  Then I just sewed a backing on with two pieces overlapped to make the envelope and did one line of stitching around the edge once I had turned it the right way.  This means no binding.
Have a great weekend!

Thursday 2 May 2013

Using Gumtree to get Free Furniture

I use gumtree quite a lot to buy and sell things. I love a bargain, like everyone, and I also like to get some money back for things I no longer need as well as making sure they are going to be used again and not just thrown away. A friend told me that she sometimes just has a look at what is on gumtree for free in her suburb. I thought what a great idea that was. So I had a look at the weekend and picked up this little beauty.
  
I saw the advert and rang up about it.  It was only a few doors down the road so we didn't even have to drive!  So it was completely free to collect and it was low carbon too.
We still need something to put shoes in by the door to the garden and so I thought we could use this basket and put it on the shelf under the table, and...
It fits perfectly!  So of course I will paint, makeover and improve the table.  It is very tired and I am not mad on a lot of dark brown.  It will be mostly white.
The top is quite stained and marked and the two sides do not match.  Also, one of the panels in the top slides out about 2cm.  It needs a bit of fixing and TLC.  But it is nothing we cannot handle.  Hopefully I will have an update of how this one progresses next week.

Wednesday 1 May 2013

WIP Wednesday

I am working on a cushion and it is for a friend.  This time I have made sure I am not tempted to keep it myself.  Most of the fabrics are hatbox by Tanya Whelan, which I love.
I have raw edge appliqued the H onto the background.  I use fusible web and stick the shapes on by ironing them with the fusible web underneath.  Then I sew around the edges leaving it raw.  I sew around a couple of times and use different colours.  I only used pale pink so you can hardly see it this time - I must buy some bright pink thread.  Then I quilted it around the letter and also straight lines on either side of the seams around the large square.  Now I just have to make it into a cushion.  I am going to use my taronga zoo fabric and make an envelope opening.  Then I shall give it to my good friend.
Have a great Wednesday!